

You may ask what does this have to do with the progress in the garden from yesterday? Trust me, it is a part of my design. I first saw penny balls on a photo blog and thought I want to do that, and do it maybe a bit better, so it would hold up in the elements. From there I did a few drawings about how I would use them, and it all came together with the help of a metal fabricator. More on that in the reveal. Today I will share how I made my penny balls, and what I learned about the materials to make them. The first ones I saw were simply pennies attached with caulk. Then I saw one with some grout, but no directions about their process, so I thought I would share what I did and learned along the way.
I have a few friends who have been dying to know why I needed their bowling balls. OK, Bud and Susan, here it comes! When I casually asked if they had any bowling balls they didn’t want they graciously gave me two of theirs to add to the two I found at thrift shops. Bud also went to a friends bowling alley and got me a couple more. I have different plans for the extras as well.
To start……..Size of the bowling balls does not matter. The first thing you want to do is sand the surface so any attachments will adhere better. I used my palm sander with 60 and 80 grit papers. I then wiped them clean with alcohol before going any further. Most balls have holes, usually three (I think). For the purposes of my project, I needed to leave one hole unfilled. The hole sizes vary so I tried to use the balls that had close to the same size holes, again because of what I was planning. One thing I learned with the first one was the hole I left open was not centered so it wouldn’t work. Fortunately I hadn’t filled it, so I just changed the hole to leave open. It was luck that the three balls I chose to use were almost the same size and all happened to be black.

You can see where I sanded the ball first. Most tutorials I read said to fill the holes with caulk. Caulk is really not meant to fill these kinds of holes and most likely will not fully dry. That means moisture will eventually pop your pennies, especially in extreme weather. I chose to use something I have used in many woodworking projects, and that is lightweight fiberglass filler. It is used by auto body shops. I learned about it from a finish carpenter and a construction foreman I was working with years ago. I always keep a gallon on hand. Because of how quickly the mixture hardens, and the depth of the holes, I stuffed a plastic grocery bag in the holes. The third one is in temporarily so I don’t get any of the mixture in there. It would be extremely difficult to remove.

You see the tube on top? That is the hardener. Work with small amount because the working time is only a couple of minutes. I used old yogurt cups to mix it, taking a golf ball sized amount of filler and put in the cup. really massage the tube to mix it before squeezing out about a one inch amount into the cup on top of the filler. I use a popsicle stick to mix and you do so vigorously until the pink hardener is completely stirred in, about 15 seconds. Then working quickly fill the holes and using a flat surfaced tool, try and make shaped as best you can to conform to the shape of the ball. Remember, you have to attach a flat penny to a round surface.
Once you work with this stuff, you will not go back to using wood fillers. It takes some practice, but it is worth it. I then lightly sanded it so the surface of the ball remained round. Some use caulk to attach the pennies. Might work, but I decided to use Amazing Goop (I really love their products, and “no” they did not give me any) ….this is my own experience and opinion. I chose to use the Marine glue. The best part of it is that it is UV resistant, and waterproof. When I finished these balls early this summer, and before I grouted them, I put them outside in the garden and they endured all summer in the rain and heat, and I didn’t loose a penny! My plan was to grout, but I wanted to test it first.

Great stuff….
I had a large container that for years I have thrown is any loose change, and there were a lot of pennies in there. Take my word for it, it is not worth counting out the 440 pennies needed for each ball. I did it this time but never again. I also decided to try and do 50% heads and the rest tails. Recent pennies are a bit different so I liked that. I also used some Canadian pennies, and at some pint I would like to do an entire penny ball using just Canadian pennies with all Maple Leaf side up. I also decided to use both shiny new and old. There were hints out there about shining the pennies, but go to the bank and ask for new pennies. I wanted my balls to have a patina. I began by putting the pennies, 10 at a time right in front of me, and using the toothpick, I squeezed the glue tube and rolled it onto the penny. After I did ten, starting at the open hole, I went in a circle, placing them on the ball. Next row, I glued them in between. Because we re dealing with a round surface and different sized balls, and relative to the size of the penny, you will have gaps no matter. I experimented in the patterns I used to place the penny on the ball, and got few gaps, but they are unavoidable. I eventually worked up in speed to putting glue on 15 pennies at a time. Is placing over 1700 pennies tedious? Yes, but it is also satisfying when you see the results, as you make a game out of it. In my mind I had my goal of what I was going to do with them. Just be careful to use enough glue to hold the penny on, but not so much that it gets squeezed to the surface and onto the surface of the coins. Below is the amount that worked well.


In progress…….one more penny, one more penny…….I used one of my old dog bowls to hold it. Decided that was safer than having it roll off the table onto my foot. You know, I am surprised that bowlers do not have major orthopaedic issues swinging that heavy ball like they do. They are heavy. Add the pennies and you have some weight going on here.

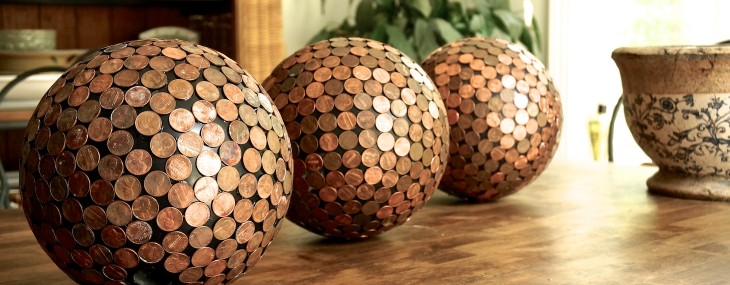
A penny ball ready for the weather test. Grouting done later. Most of the ones I saw were ungrouted and looked unfinished to me. I also thought that it would survive winter better with grout as well.

I still can’t believe I did this…..


So there they are, the three balls I need for my garden project. The garden is called the penny ball garden now. If you missed yesterdays post on putting together that garden, you can read it here. Day before yesterday I had KBJ bring them in from the garden and I checked them over, and then grouted and sealed them. Tomorrow I will have a tutorial on that, and then the garden reveal after that. Hope you will come back to see the results. The grouting makes a huge difference in their looks. Thanks for stopping by. Laters, charisse


I love these. Now I’m wondering if I could try out a penny covered lantern I have in the garden..
Hi Marie,
I think it might depend on how much heat your lantern gives out. Expansion and contraction might “pop” or loosen the pennies.Perhaps adhering them with a flexible grout would solve that issue? The look would be lovely on a lantern, so heck, try it and see how it goes.
Had a great time with my 2 5 yr old grandsons gluing pennies on a rainy day. They wanted to put one tail on a ball of all heads so their parents could search for it. If u make the hole in the tube of goop small u can have them hold the penny, goop it right from the tube, and have them place it. Used a marker with a line around the center of the ball for them to follow. Then just kept the next series of pennies touching the first line. We had a “ball”!
I made one of these years ago and didn’t use the right glue so when I put it outside, some of the pennies fell off. I glued them back on and made it an indoor ball. It’s beautiful. In the meantime I lost my instructions so I was happy to find your site. Thank your displaying and explaining the process so beautifully. This will be my project for Christmas gifts. I have been saving pennies a long time and am looking forward to making some balls that will work outside.
At least you will never be Penniless!!!!!
oooooh, Could you imagine going to pay a bill of say $10, and handing them 3 bowling balls and expecting change? Now that would be funny…..
Oh I love them. Quite the conversation pieces! Can’t wait to see more on this subject. A superb job. You have an incredible supply of patience to make these.
Thx for sharing,
Victoria
Either patience of a mindless mindset!
All I can say is WOW…not in my wildest imagination did I even come close to thinking this project was going this way!!! Can’t wait to see this in the garden…so clever!
Thanks and I look forward to sharing where the project went from this point.