


Almost anti-climatic, but the penny ball garden is finished for now. I planted the shrubs, perennials, and grasses, and now have to wait until spring to see if it will look as I have imagined. But the bones are in place, and it needs only mulch now and a few spring bulbs before it rests for the winter. The leaves are pretty much all down off the tulip trees, the firebushes and dogwoods are bright red, and just enough hints of color in the rest of the trees now to say, “yes” , the summer is behind us. For your viewing pleasure, and a hit to your funny bone, first, here is a very,very short video of how KBJ and I put this garden together. If only it happened like this! The photos follow.
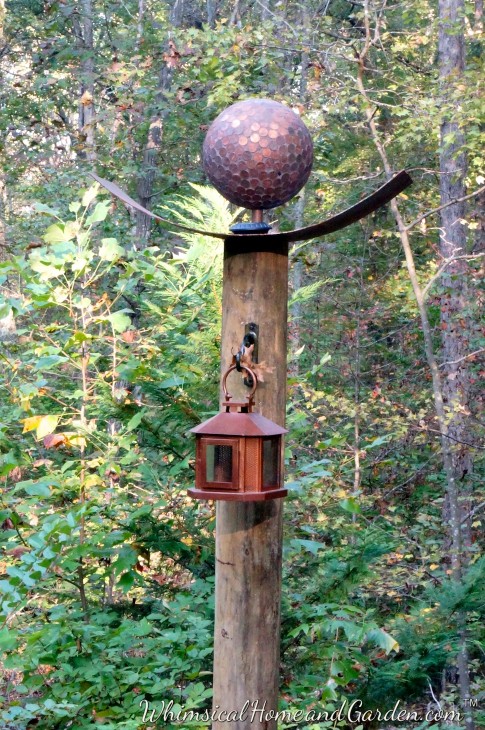
I had a metal fabricator make the 1/4 in x 24in x 36 in curved tray based on drawings and measurements I had done. It was important that the tray and the ball be in balance size wise, knowing that they would sit on a 7-8in post. These were the most expensive parts of the project. I also had him drill a hole in the center of the tray to accommodate a copper tube that would sit in a hole in the log, and allow for the ball to sit above the curved tray by a couple of inches. My intent in choosing steel was so it would develop a coat of rust and a patina to complement the penny balls. The little black thingy sitting on the tray is a small solar light, as I wanted light at night that I could both see from the house, and also bid welcome to folks driving in the driveway to the house. The lanterns hanging from the post can handle either a wax or oil candle. In the spring, I think we will probably use solar lights on the ground that shine up to illuminate each post a bit more as well and some of the landscape. This particular pocket garden is the furtherest one from the house and is about 200 feet away.

We placed the log poles in test holes to see how best to place them. We played with positioning just two to begin with to decide height and placement. We wanted all three to be visible from the house when leaving, and at the curve in the drive when entering…..tricky, and it required us to play with it a bit. Meanwhile these heavy bowling balls were a balancing act. In front, some of the plants ready to go in the ground and into the new soil.

It sure helps to have an over 6ft tall friend around to help with the tall stuff. You can also see in the background that there are the three crepe myrtles already transplanted from along the RR ties on the side. They get more sun there, and seem to really like it in their new space.

We went back and forth from all positions on the driveway and close to the house to see what looked best.

Precariously balanced in their holes, this is what we settled on. Mint Julep junipers planted in the background. Will get about 3-4 foot high.

Next we leveled and tamped the log posts into place. The balls, as I mentioned yesterday, were not yet grouted when we did this, as I wanted to make sure the glue would hold up. It sure did.

KBJ bringing me some plants to get in the ground.

KBJ helping me plant. Quick learner, he was breaking up some of the roots before putting them in the ground.

Watering them in a bit, even though we put water in the holes when we planted. It was very, very hot. At this stage I had still not added the grasses and the butterfly bushes on the back side of the posts. When I did, they took and flowered quickly. It was so special to come down to check on the garden (when it wasn’t raining) and see so many different butterflies.

It is an illusion that the posts sometimes look un-level, mostly because the trees are not straight, which you can see here.

In this perspective you can see how very tall my trees are, and how the posts help scale things down a bit. I am looking forward to seeing this garden more mature in the spring. From the house it looks very nice, especially when there are lights on the penny balls at night.

The plants we had at that point are all in, and we got to enjoy some blooming flowers for a few weeks. I also divided some of my daylillies from other locations to here, but did that a few weeks later.

It will look much better when it is mulched, but the soil was so wet from weeks and weeks of rain, we decided to wait until early fall to do it.

Jump forward to a few days ago, when the balls came off their posts for me to grout. They are back up, and with the addition of copper lanterns, seen below. I have had them for a while, and were part of the plan I was thinking when I was designing the space. They were a steal last fall for just a few dollars each on clearance at Lowe’s. Yahoo!!! The brackets were repurposed from an old project.


Most of the plants and flowers have faded, but the plantings I included in this garden are Virginia Sweetspire, junipers, day lilies, shrub roses, iris, butterfly bushes, grasses, rudbeckia, daisies, Clemoe, barberry and liriope, which the rabbits, durn them, have relished, roses, and three crepe myrtles.

When you walk around the property , this area was a kind of hole in the landscape, especially because they left one lone tree standing outside the wooded perimeter when they cleared for the septic system, so my wish was to mimic trees by using the log posts to stand in for smaller trees, visually bridging the areas.


Behind the posts is the one lone tree that looked so out of place in the landscape.

The leaves on the trees are fading as well into autumn color, but try and imagine this area without the posts…..all the landscaping would never be seen, it would simply blend into all the green of the woods. Now the posts provide a place for the eye to land (for better or worse) and allow you to “find” the shrubs and flowers, especially when you are driving in the driveway. Everything has already faded, as I just took this photo, but come spring, ooolala.
So there you have it….the last garden project for a while. Next spring, God willing and the creek don’t rise, all the new pocket gardens will be a welcome addition to these woods where I garden. If you missed the two part tutorials on how to make the penny balls, you can read them here……Part One and Part Two. Thanks again for stopping by. And special thanks to KBJ, who is is always such a good sport when it comes to helping me in my gardens, as it really is not his thing. Laters, charisse


Stunning!
Well, not sure about stunning, but I am quite happy with how it turned up. When the feather grasses and the flowers grow and fill in, the log poles will look less like sticks, and more a part of the landscape. Just takes time.
Bowling balls never looked so good! Such a beautiful garden project, Charisse. I love the video! If only certain projects would progress that quickly! 🙂 You guys make a great team. The curved metal trays compliment the penny balls so well. I love your use of solar lights and lanterns. It is interesting how the new poles lower the height illusion of the surrounding trees. I would never have noticed without you explaining that. Very clever use of these penny balls and poles. Whimsey indeed and such a magnificent display of art. I too look forward to your spring photos of this penny pocket garden!
Thank you Victoria……..I am looking forward to photos of your amazing gardens with all the new additions you and Robert have added. It is kind of sad to see everything fade, but I am ready for this change of seasons to my favorite time of year. It is rest time for both flowers and me! Well, except for putting everything to bed (cleanup) for the winter!
Love it…what more can I say! A touch of whimsy in a beautiful setting. Again you never cease to amaze me. KBJ good job too!
Thanks Susan, even though I am happy that this terrible summer is over, and I am enjoying every cooler day of fall, it will be fun to see how these gardens do next spring. It was a fun project.
Awesome…I can see this was a real labor of love Charisse….great job its beautiful. Enjoy!
Thank you Tina. Every time you stop by it seems I am up to my eyeballs in some garden project. I am looking forward to working on some client interior design projects, introducing my readers to some extremely talented artists, and interior projects for myself, especially with the holidays quickly approaching. I wanted to enter your photo contest, but alas, had no current autumn photos as the trees are holding on to every last bit of green they can, and although the air says it’s fall, the color not so much! Thanks so much for stopping by.It sounds like you have been incredibly busy yourself.